Ogone is one of the leading European Payment Service Providers with more than 28.000 clients across 40 countries.
Ogone is connected through certified links to more than 200 European banks/acquirers that enable handling of international payment methods like Visa, MasterCard, American Express, Diners Club and JCB as well as local ones like iDEAL and Machtigingen in The Netherlands, Solo and Maestro UK in United Kingdom and ELV and giropay in Germany.
Installing Ogone extension in Magento
For Magento, there is a Ogone Module (community edition extension) released officially by the Magento Core Team.
At present this only supports to Magento CE (Community Edition) version 1.3. It might not support the latest versions of Magento CE. However, Ogone payment method is present by default in Magento EE (Enterprise Edition).
Update: 2012-06-13
Here is a FREE Ogone Extension by Netresearch.
It supports all current Magento editions:
– Community Edition 1.6.2.0
– Professional Edition 1.10.0.0
– Enterprise Edition 1.10.0.0
You have to install this Ogone Extension in your webshop.
End user documentation of this extension is also available here (German) and here (English).
Creating account in Ogone
– Go to Ogone website
– Select your desired country. The country selection list is present in the top header of ogone.com
– Then under ‘Merchant login’, you will find link to login to ‘Production Account’ and ‘Test Account’. You will also find link to ‘Create a Production Account’. In the website, you will also find a button to ‘Create FREE test account’.
Link to Register for Production Account: https://secure.ogone.com/ncol/prod/new_account.asp?BRANDING=ogone&ISP=OBE&SubID=1&SOLPRO=&MODE=STD&ACountry=BE&Lang=1
Note: ACountry=BE (this indicates the country is chosen as ‘Belgium’)
Link to Login to Production Account: https://secure.ogone.com/ncol/prod/frame_ogone.asp?BRANDING=ogone&ISP=OBE&SubID=1&SOLPRO=&MODE=STD&ACountry=BE&Lang=1
Note: ACountry=BE (this indicates the country is chosen as ‘Belgium’)
Link to Register for Test Account: https://secure.ogone.com/ncol/test/new_account.asp?BRANDING=ogone&ISP=OBE&SubID=1&SOLPRO=&MODE=STD&ACountry=BE&Lang=1
Note: ACountry=BE (this indicates the country is chosen as ‘Belgium’)
Link to Login to Test Account: https://secure.ogone.com/ncol/test/frame_ogone.asp?BRANDING=ogone&ISP=OBE&SubID=1&SOLPRO=&MODE=STD&ACountry=BE&Lang=1
Note: ACountry=BE (this indicates the country is chosen as ‘Belgium’)
When you register for Test or Production account, you need to consider the following things:-
– Provide PSPID (this will be required for login)
– Provide valid company email address. Gmail, hotmail, yahoo, etc. email addresses are not valid for Ogone account.
After you submit the registration form, Ogone team will review your data and if everything is okay and valid, then they will email you the login password. They will also email you, if the registration data is invalid.
Making necessary settings in Ogone
Adding Payment Methods
To add payment methods to Ogone, you can click on the ‘Payment methods‘ menu present in left sidebar.
Then, you will see the following page. From here, you can add and edit payment methods present in Ogone.
Adjusting Technical Settings
The other and the most important settings for Ogone payment method is the Technical Setting. You can access the technical settings page by clicking the ‘Technical information‘ menu present in left sidebar.
After that, you go to the technical settings page. The first tab is ‘Global transaction parameters‘ tab. Check if the settings in that page is like the below image.
Click on the image to view full size.
Click the ‘Confirm’ button present in the bottom of this page. Then you will proceed to ‘Global security parameters‘ tab. Check if the settings in your page is similar to the image below.
Click on the image to view full size.
Click the ‘Confirm’ button present in the bottom of this page. Then you will proceed to ‘Payment Page Layout‘ tab. Check if the settings in your page is similar to the image below. You must put your website URL instead of example.com.
Note that your URL might also contain ‘www’ in the beginning like http://www.your-site.com
Click on the image to view full size.
Click the ‘Confirm’ button present in the bottom of this page. Then you will proceed to ‘Data and origin verification‘ tab. Check if the settings in your page is similar to the image below.
Put your website URL instead of example.com.
SHA-IN Pass phrase should be 16 character long consisting alpha-numeric characters. For example: 123456789@abcdef
Click on the image to view full size.
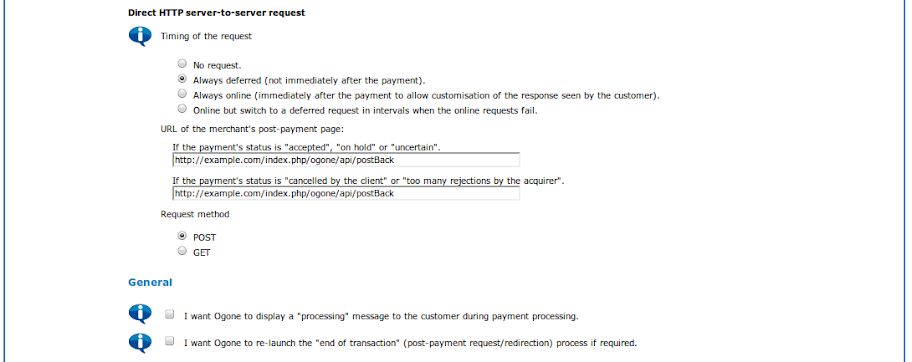
Click the ‘Confirm’ button present in the bottom of this page. Then you will proceed to ‘Transaction Feedback‘ tab. Check if the settings in your page is similar to the image below.
SHA-OUT Pass phrase should be 16 character long consisting alpha-numeric characters. It should be different from SHI-IN Pass phrase. For example: 123456789#abcdef
Click on the image to view full size.
Click on the image to view full size.
Click on the image to view full size.
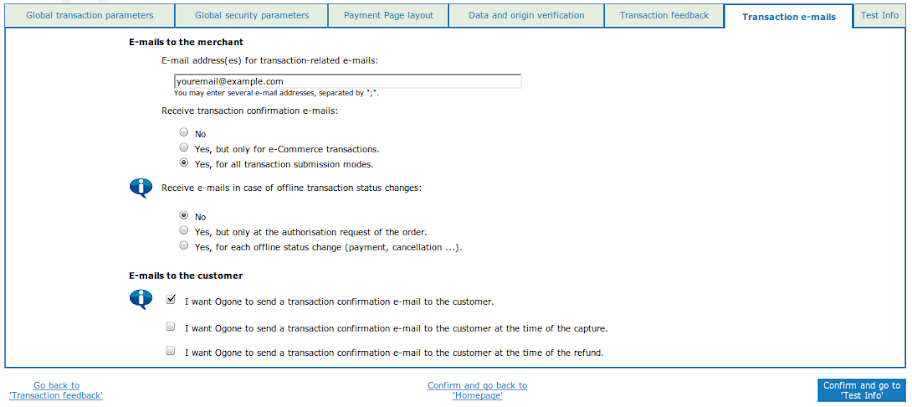
Click the ‘Confirm’ button present in the bottom of this page. Then you will proceed to ‘Transaction e-mails‘ tab. Check if the settings in your page is similar to the image below.
Click on the image to view full size.
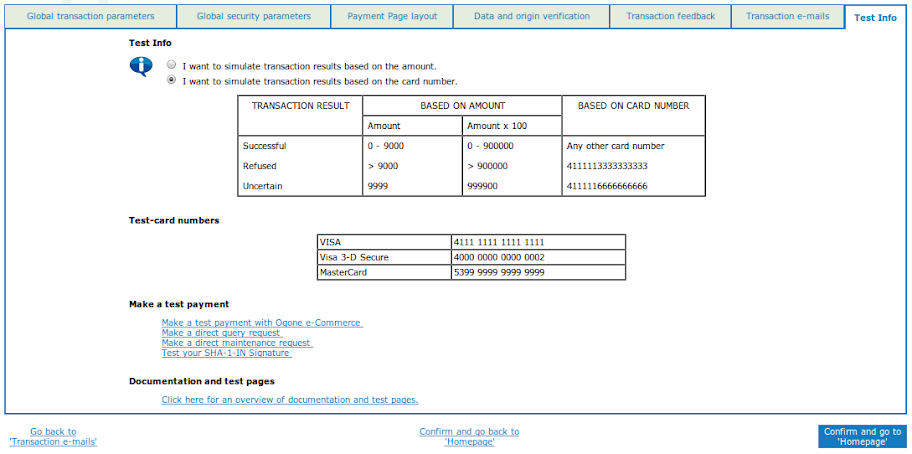
Click the ‘Confirm’ button present in the bottom of this page. Then you will proceed to ‘Test Info‘ tab. Check if the settings in your page is similar to the image below.
Click on the image to view full size.
Making necessary settings in Magento Admin
After completing the settings task in Ogone, we need to make changes in the Ogone payment module settings in Magento admin.
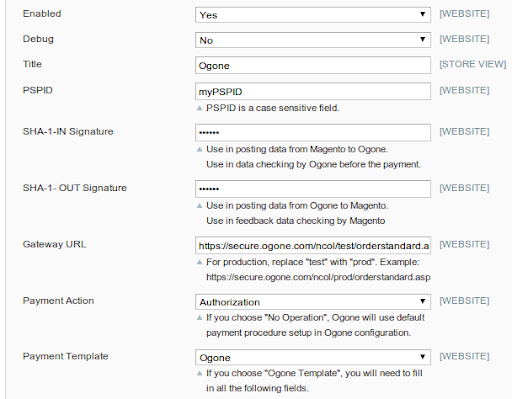
Go to: System -> Configuration -> Payment Services -> Ogone Account
myPSPID should be your PSPID that you entered while registering in Ogone.
SHA1-IN and SHA1-OUT Signature should be the one which you entered in SHA-IN and SHA-OUT Pass phrase in Ogone settings.
You can adjust the Gateway URL for test account and production account.
Test account Gateway URL: https://secure.ogone.com/ncol/test/orderstandard.asp
Production account Gateway URL: https://secure.ogone.com/ncol/prod/orderstandard.asp
End user documentation of this Ogone Extension is also available here (German) and here (English).
Click on the image to view full size.
Finally, Ogone configuration is completed and now you can use fully functional Ogone Payment method in your Magento shop.
Hope it helps. Thanks.


